Installation and user-guide. Automate in Unite workflow
19/02/2024
Version Requirements for Automate in Unite
|
Automate in Unite version |
Unite |
Highlights |
| 2.5.0 | 1.8.17.0 with product version 26.1 and higher | Automate Nightguard workflow is added |
| 2.4.0 | 1.8.13.1 with product version 25.2 and higher | Inlay/Onlay workflow is supported |
| 2.3.0 | 1.8.10.0 with product version 24.1.10 | Crown workflow supported |
| 1.1.0 | Unite 1.7.83.0 with product version 23.1.4 | Crown workflow supported |
Supported Countries for Automate Crown
- Åland Islands
- American Samoa
- Anguilla
- Aruba
- Australia
- Austria
- Bangladesh
- Belgium
- Bermuda
- Bonaire, Sint Eustatius and Saba
- Bouvet Island
- Brazil
- British Indian Ocean Territory
- Bulgaria
- Canada
- Cayman Islands
- Chile
- Christmas Island
- Cocos (Keeling) Islands
- Croatia
- Curaçao
- Cyprus
- Czechia
- Denmark
- Estonia
- Falkland Islands (Malvinas)
- Faroe Islands
- Finland
- France
- French Guiana
- French Polynesia
- French Southern Territories
- Germany
- Gibraltar
- Greece
- Greenland
- Guadeloupe
- Guam
- Guernsey
- Heard Island and McDonald Islands
- Hong Kong
- Hungary
- Iceland
- Iraq
- Ireland
- Isle of Man
- Italy
- Jersey
- Korea, Republic of
- Latvia
- Lebanon
- Liechtenstein
- Lithuania
- Luxembourg
- Macao
- Malta
- Martinique
- Mayotte
- Montserrat
- Nepal
- Netherlands
- New Caledonia
- New Zealand
- Norfolk Island
- Northern Mariana Islands
- Norway
- Pitcairn
- Poland
- Portugal
- Puerto Rico
- Qatar
- Réunion
- Romania
- Saint Barthélemy
- Saint Helena, Ascension and Tristan da Cunha
- Saint Martin (French part)
- Saint Pierre and Miquelon
- Singapore
- Sint Maarten (Dutch part)
- Slovakia
- Slovenia
- South Africa
- South Georgia and the South Sandwich Islands
- Spain
- Svalbard and Jan Mayen
- Sweden
- Switzerland
- Taiwan
- Tunisia
- Turks and Caicos Islands
- United Arab Emirates
- United Kingdom of Great Britain and Northern Ireland
- United States of America
- United States Minor Outlying Islands
- Virgin Islands (British)
- Virgin Islands (U.S.)
- Wallis and Futuna
I. Creating a mixed restoration case with Automate Restorations
1. Go to the “Patients” tab in 3Shape Unite.
2. Create a new patient.

3. Once the patient is created, a new window will pop up.
4. Under the "Everything else" menu, select Automate Restorations workflow.
5. Mark the teeth with the Crown and/or Inlay/Onlay indication.
6. After selecting the indication, proceed with TRIOS scanning. Indicate the tooth being scanned according to the selection in the order form.
OR: If no Trios scanner is attached, then you can import scans by clicking “Import scans” button on the Order form page.
NOTE: For imported scans, prepared teeth should correspond to those selected in the Order Form. Upper and lower scans are mandatory, the bite scan is optional but highly recommended.
7. Once all required Order form details and scans are added, the Automate Restorations step is enabled.
II. Creating a single restoration case using Automate Crown or Automate Inlay/Onlay
You can start the case directly from the Patient Library by selecting existing digital impression. In this scenario, Automate Crown and Automate Inlay/Onlay are handled as separate workflows.

III. Automate Restorations workflow
Teeth marked during scanning, or prepared teeth in imported scans, should correspond to those selected in the Order Form.
1. After selecting the Automate Restorations integration workflow, the case opens on the Automate page.
2. To view instructions, click the “i” icon and then select the “Instructions” button.
3. You can see all design preferences by clicking “Show advanced preferences” button.

4. Select a material from the available materials list, fill in other design preferences and choose the turnaround time.
5. When all details are filled in, click the ‘Upload’ button.
For mixed Crown and Inlay/Onlay restorations, only one material can be selected. It is not possible to assign different materials to each restoration type.
Tip: If you need to use different materials, we recommend creating two separate orders from the Patient Library.

6. You will be transferred to the Automate order upload page.
7. You may stay on the Result page and wait till the design is ready, or close the page and re-open it after.![]()
Please note that orders submitted more than 20 days ago will not be available for opening in Automate Restorations app.
IV. Check your Automate Restoration design
1. You can observe the designed restorations in multiple views:


5. By clicking “Edit/View 3D” button, you can open 3D Editor that allow you to make changes to the design. On the image below you may see ‘Edit Anatomy’ tab where the crown design is edited by various tools.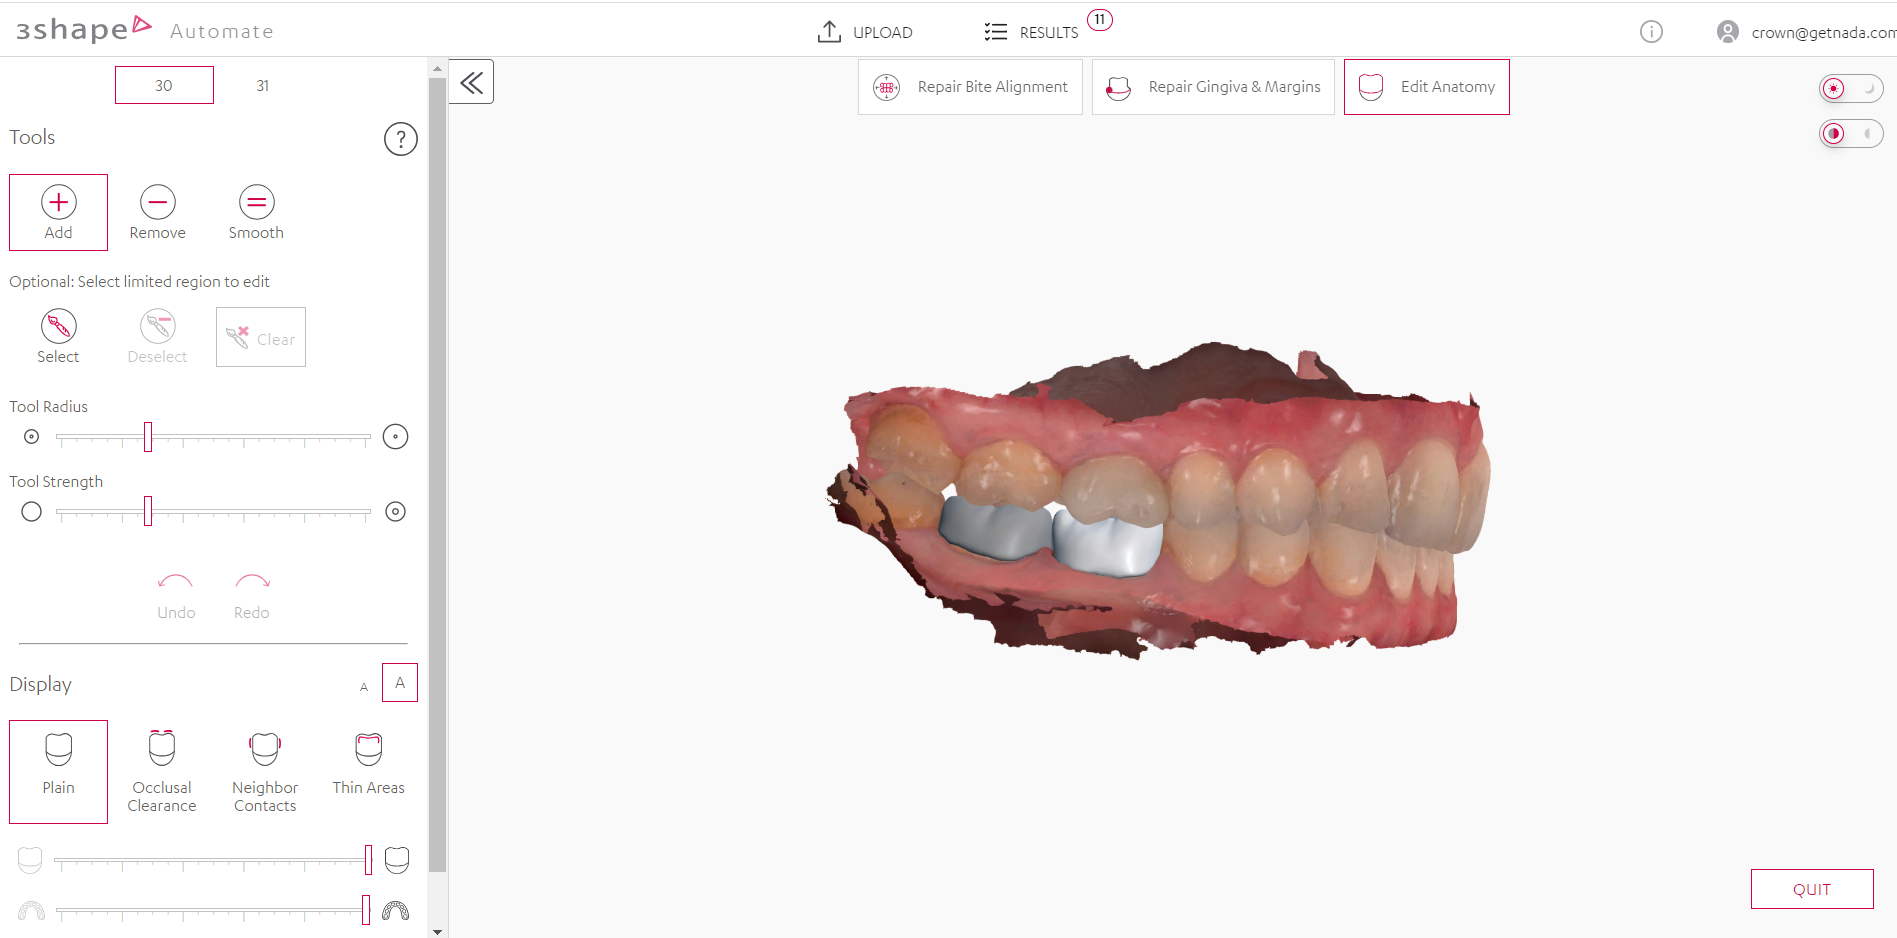
6. You can edit Bite alignment: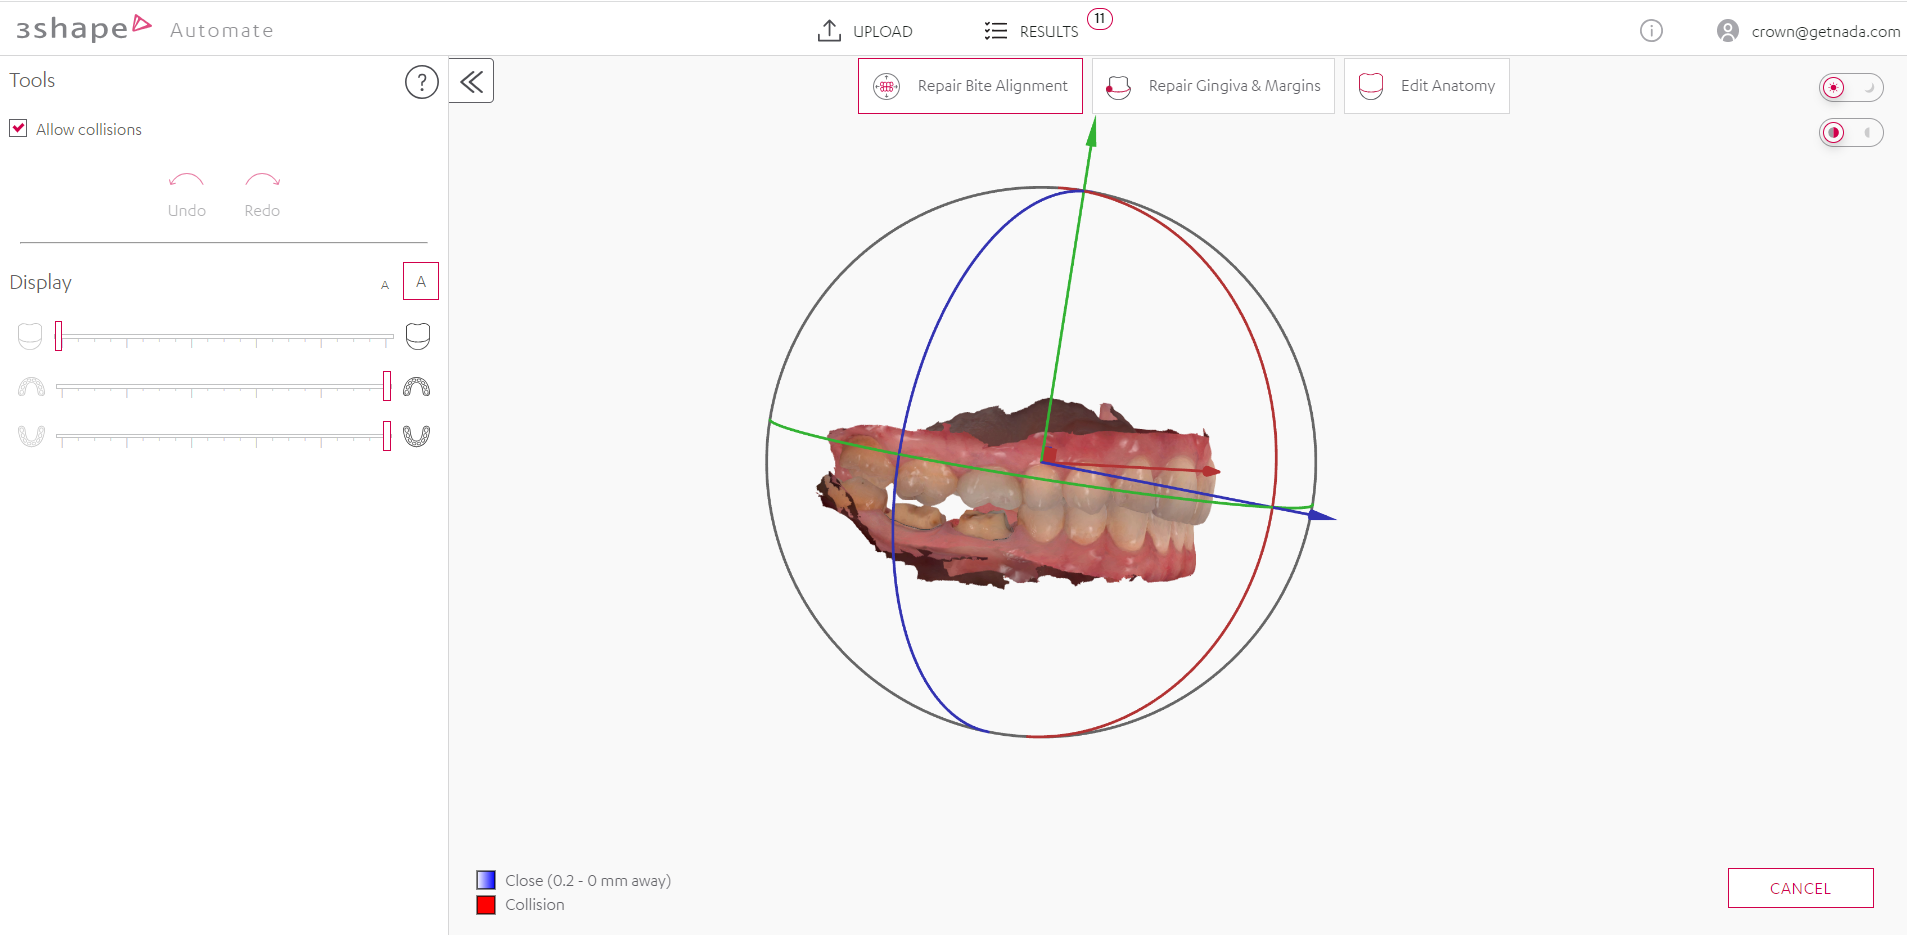
7. Repair Gingiva & Margins: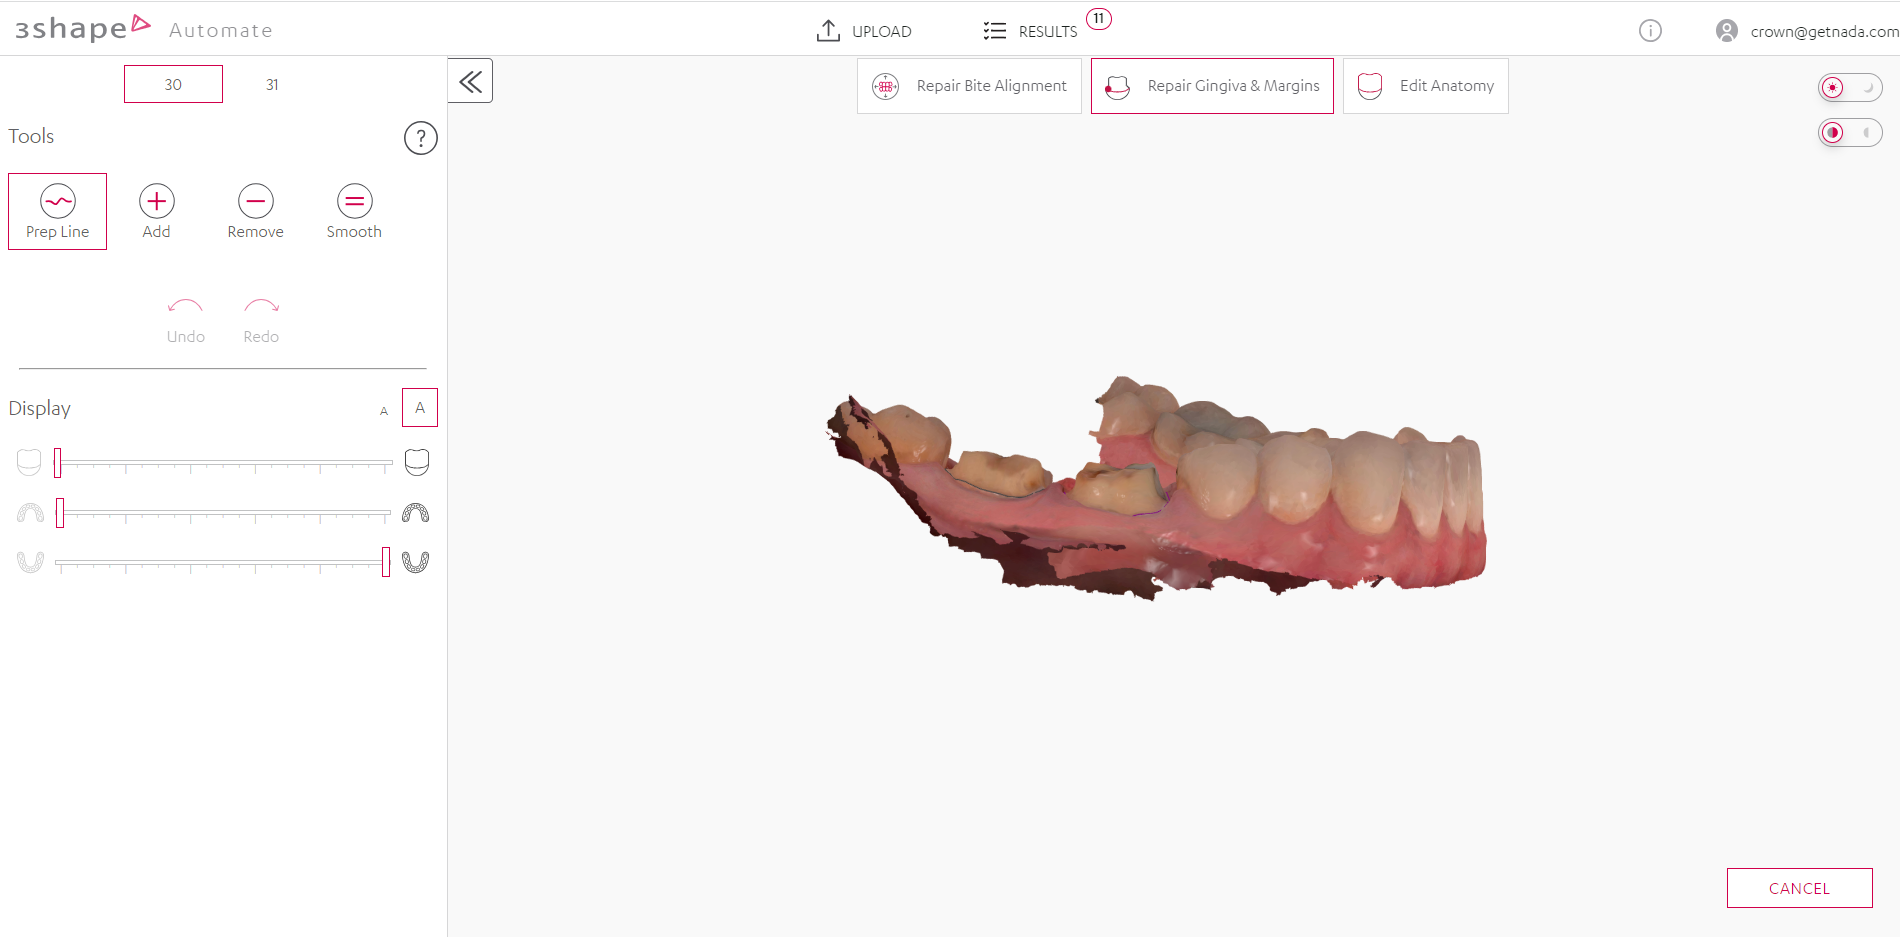
8. After applying necessary changes, you may go back by pressing “Quit” button:
9. You can now Reject or Accept the case by clicking respective buttons. If the case is accepted – CAM output can be downloaded on the next step.
V. Produce workflow
To use the Produce feature, it must be installed in Unite. Produce is typically available with 3Shape Studio Apps (Implant Studio, TRIOS Design Studio, Splint Studio), Model Maker and Model Builder Express.
1. After the crown is designed, you may export CAM output file for manufacturing/milling or go further on the workflow to the "Produce" step, if you have a milling machine connected to your system.
2. You can set up your milling machine to send your design directly to it by clicking ‘Machine setup’ and ‘Send’ buttons, or save your design to a folder.
3. After clicking ‘Machine setup’, please select a machine to connect by clicking ‘Setup’ button.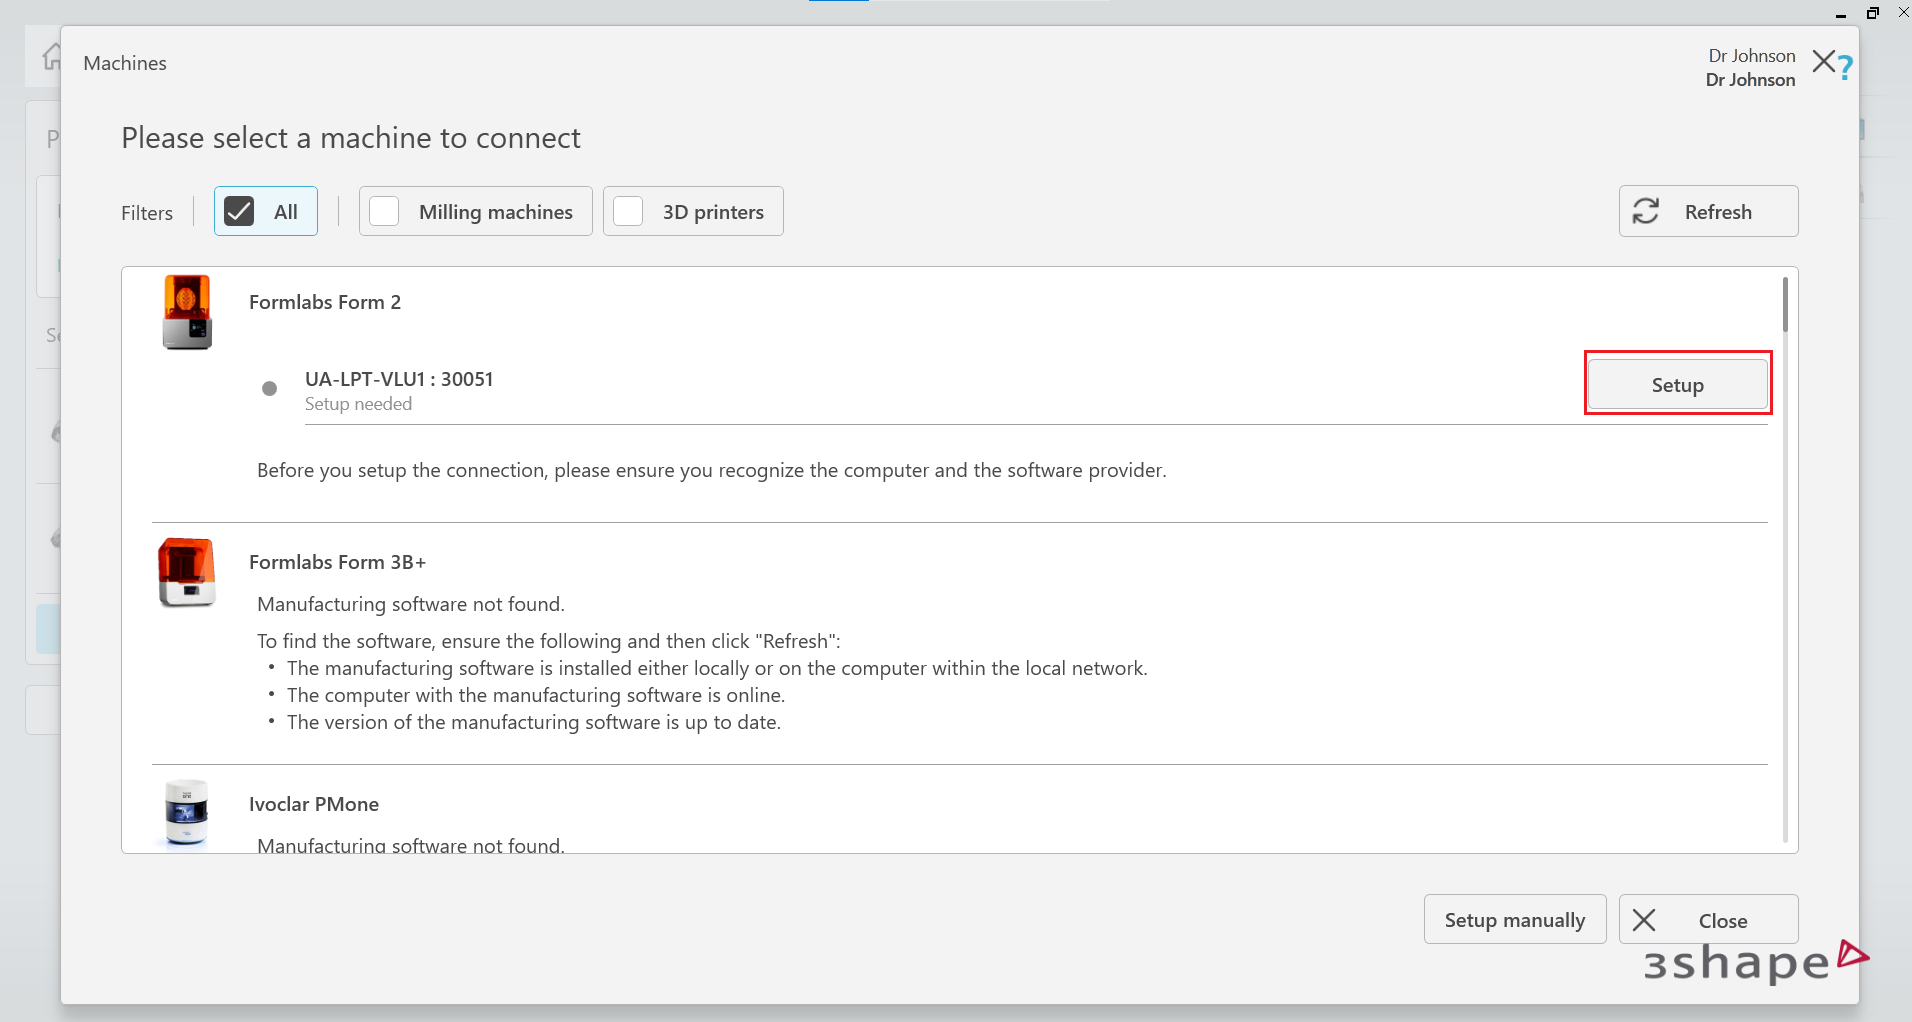
4. After connection is established, the status will be changed to ‘Connected, online’.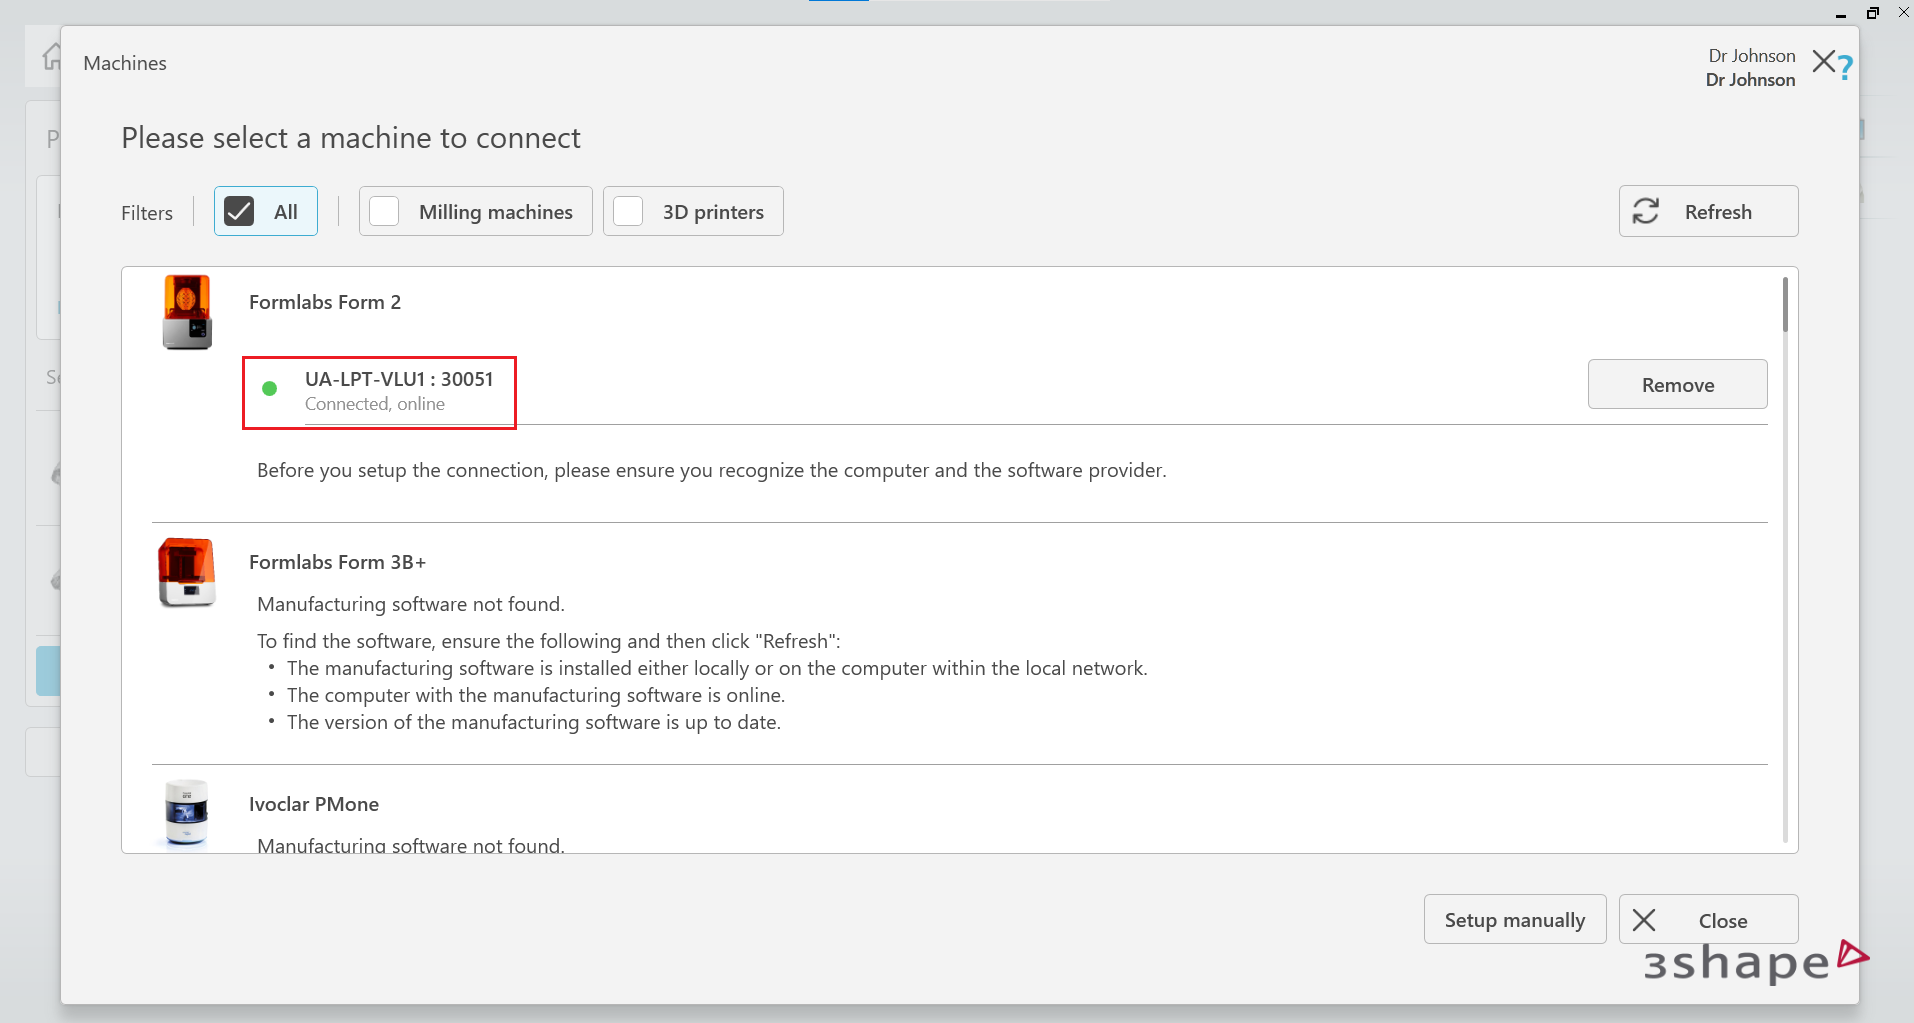
5. You can now send your designs to the connected machine. Production status will be displayed while designs are in production.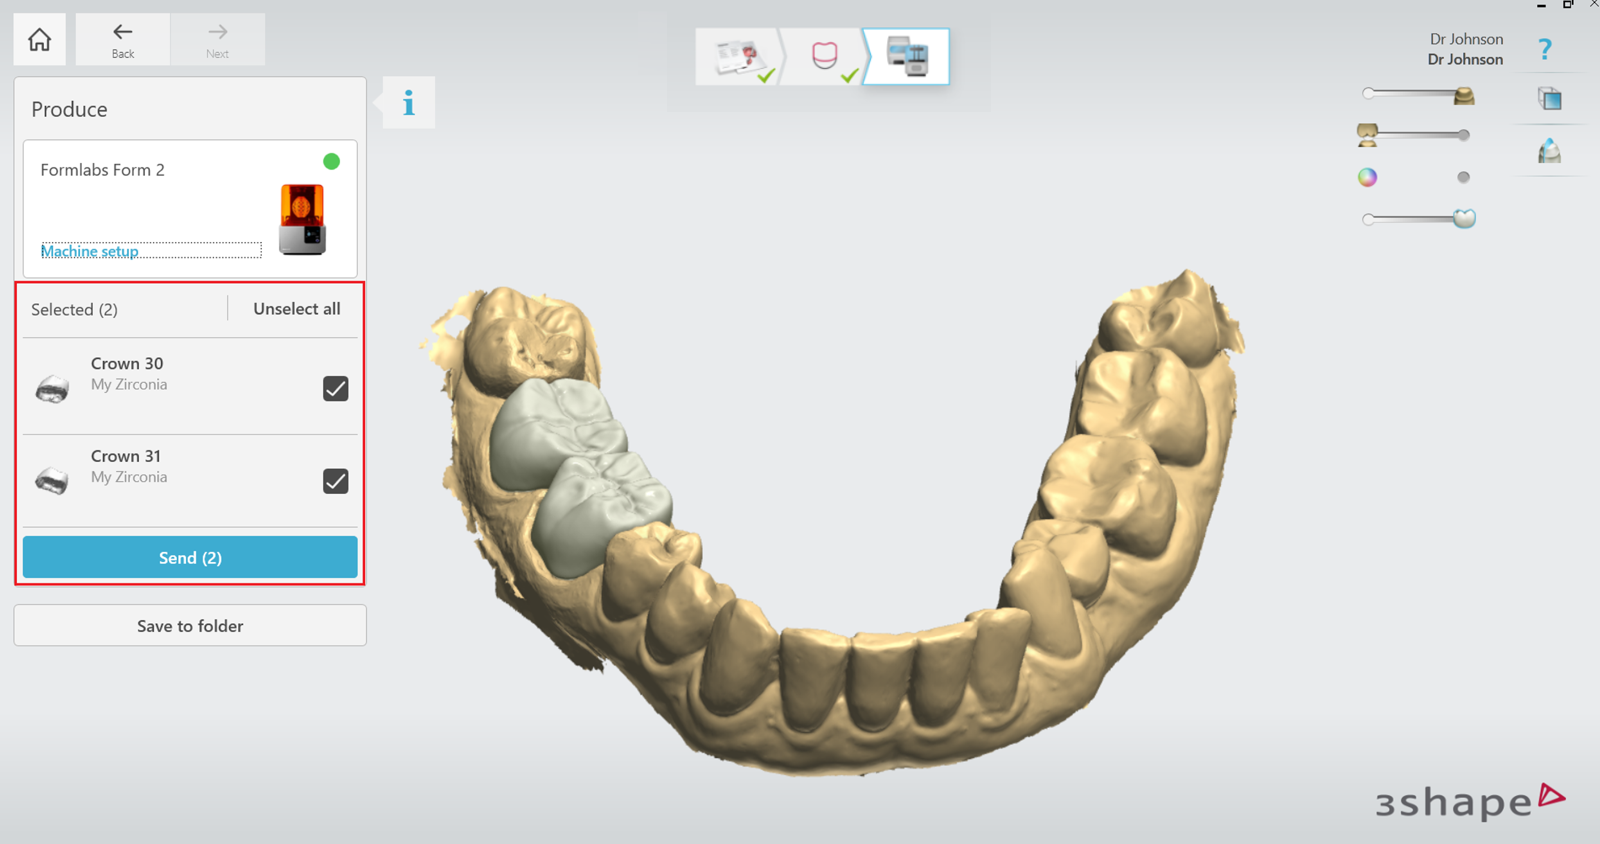
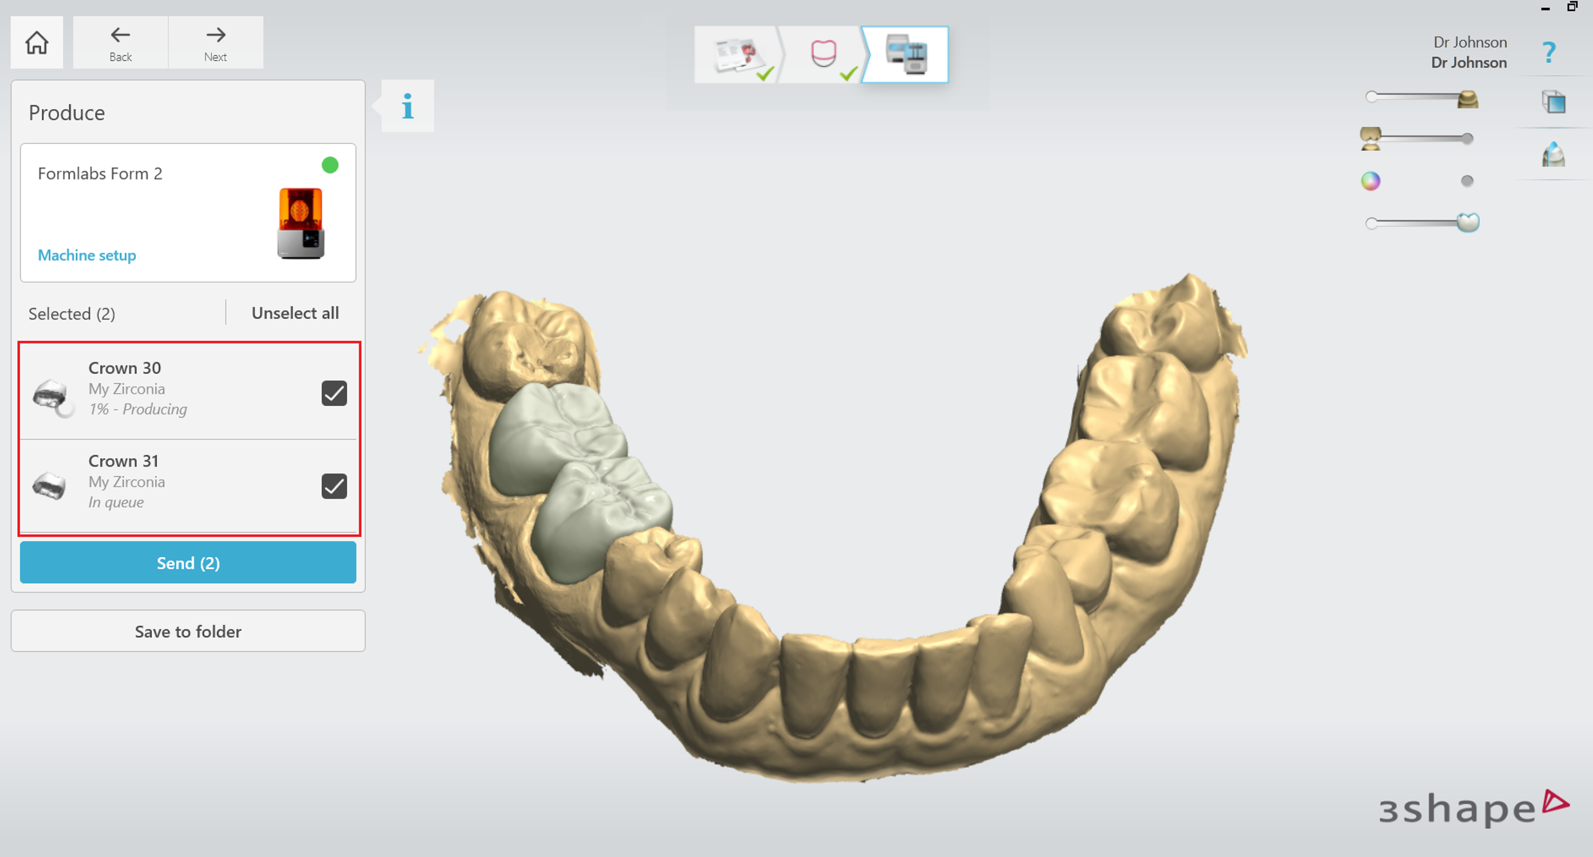
6. When completed, a corresponding status will be displayed.
You can save your design output file in the STL format to a selected folder on your PC by clicking ‘Save to folder’ button and selecting the folder.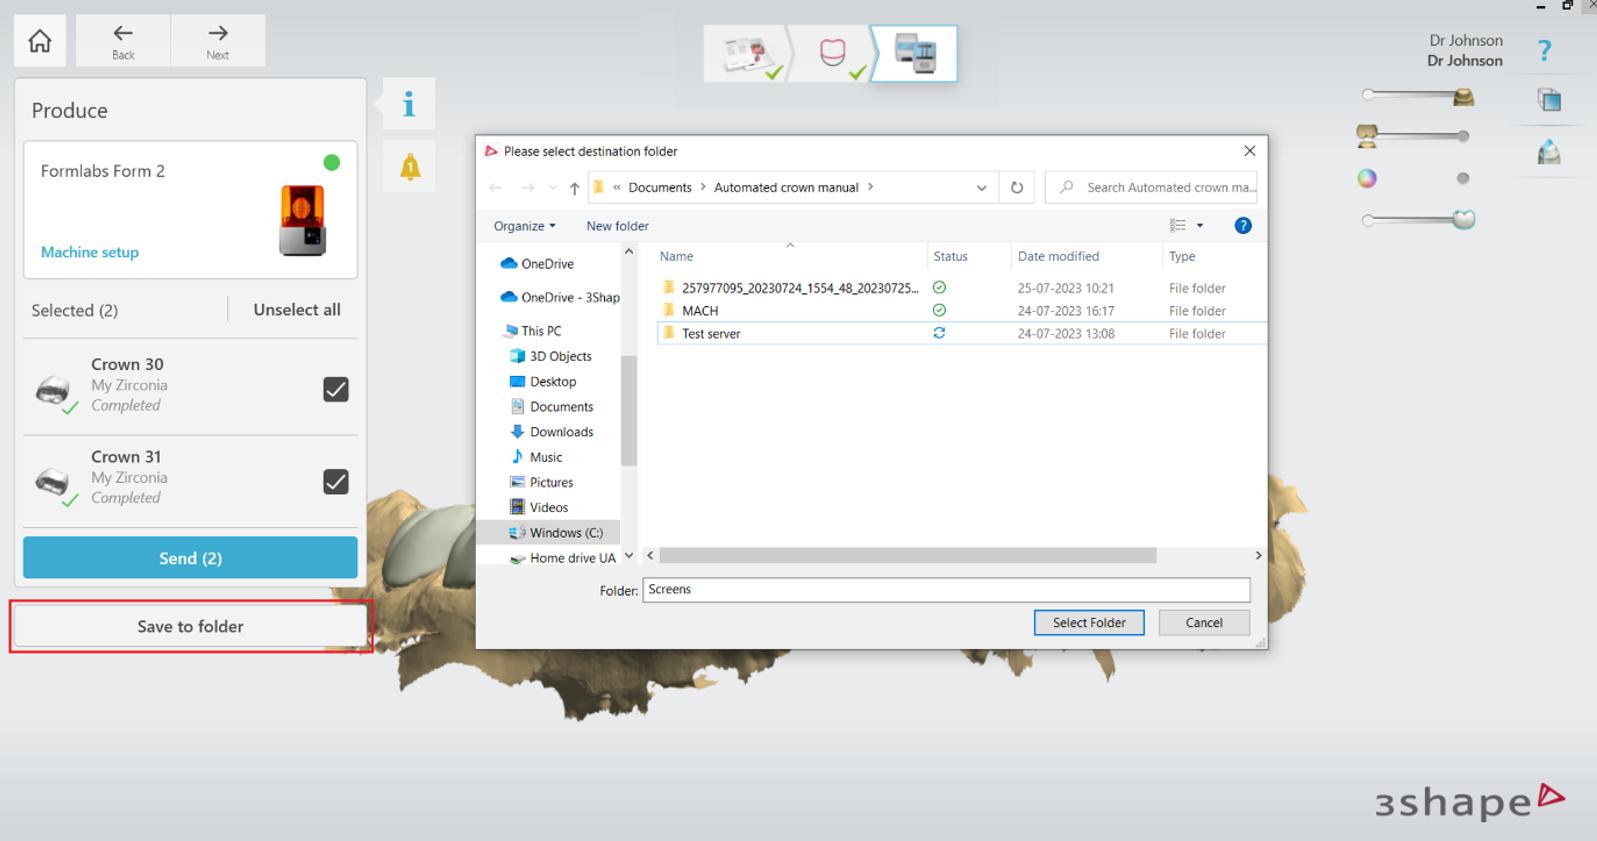
VI. How to get your CAM design if there is no machine connected to Unite
- Go to https://automate.3shape.com
- Click Sign In and log in with your Communicate credentials, or sign in with Communicate ID.
- You can observe cases list and their statuses under the “Results” tab. Case ID corresponds to the ID in the 3Shape Unite.
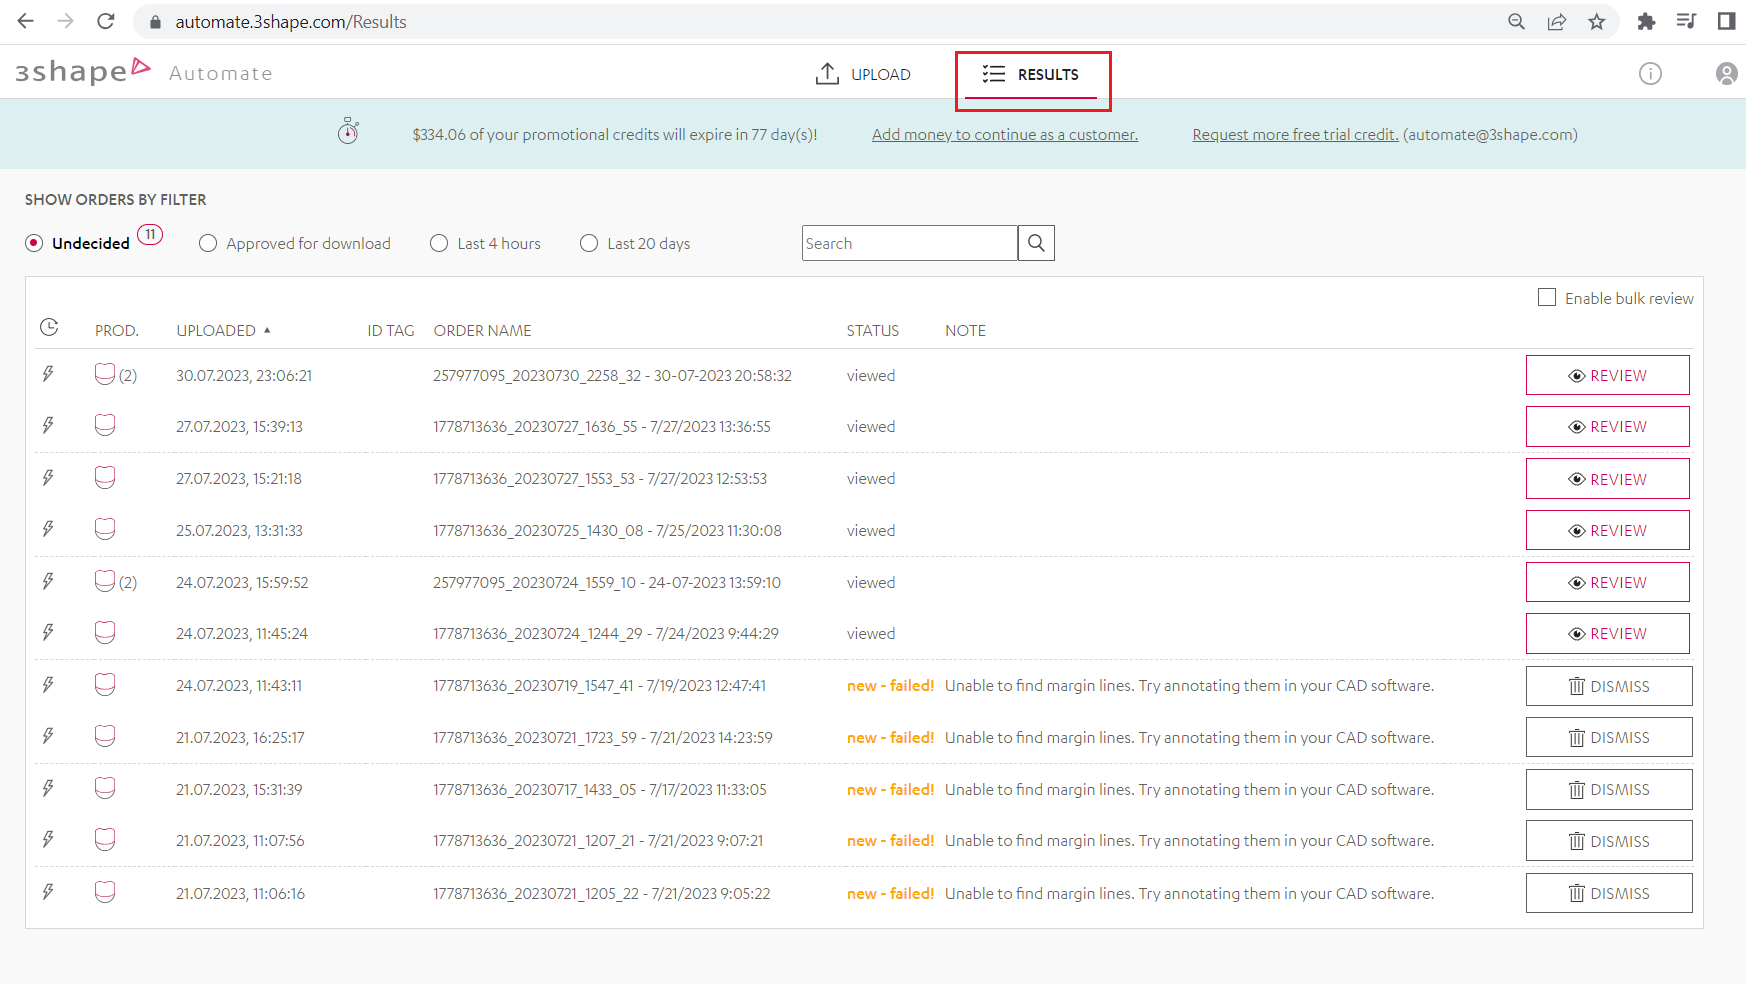
4. To download the file - press “Review” and “Re-download CAM”
Contact 3Shape Support if you have further questions.
For full information on correct usage, please consult the official Safety and Setup Guide and the most current Manual.