TRIOS Wireless scanner does not connect
12/03/2025This article will help you troubleshoot the connectivity issues with 3Shape TRIOS Wireless scanners.
All wireless TRIOS scanner
1. Make sure that the TP-Link is connected directly to a port in your PC/Cart/MOVE, not to a USB hub
We don't recommend to use the USB hubs, since they can sometimes interfere with Wireless USB adapters affecting connectivity and speed.
2. Try to cross-check
- Try changing the USB port for the TP-Link or try TP-Link from another system (if you have one).
- Try to connect the scanner to another PC (if you have one).
3. Check if the scanner serial number is correct
The serial number of the scanner added to the software must be the correct serial number of the scanner you are trying to connect. Find the settings below under More → Settings → TRIOS → Scanner Management.
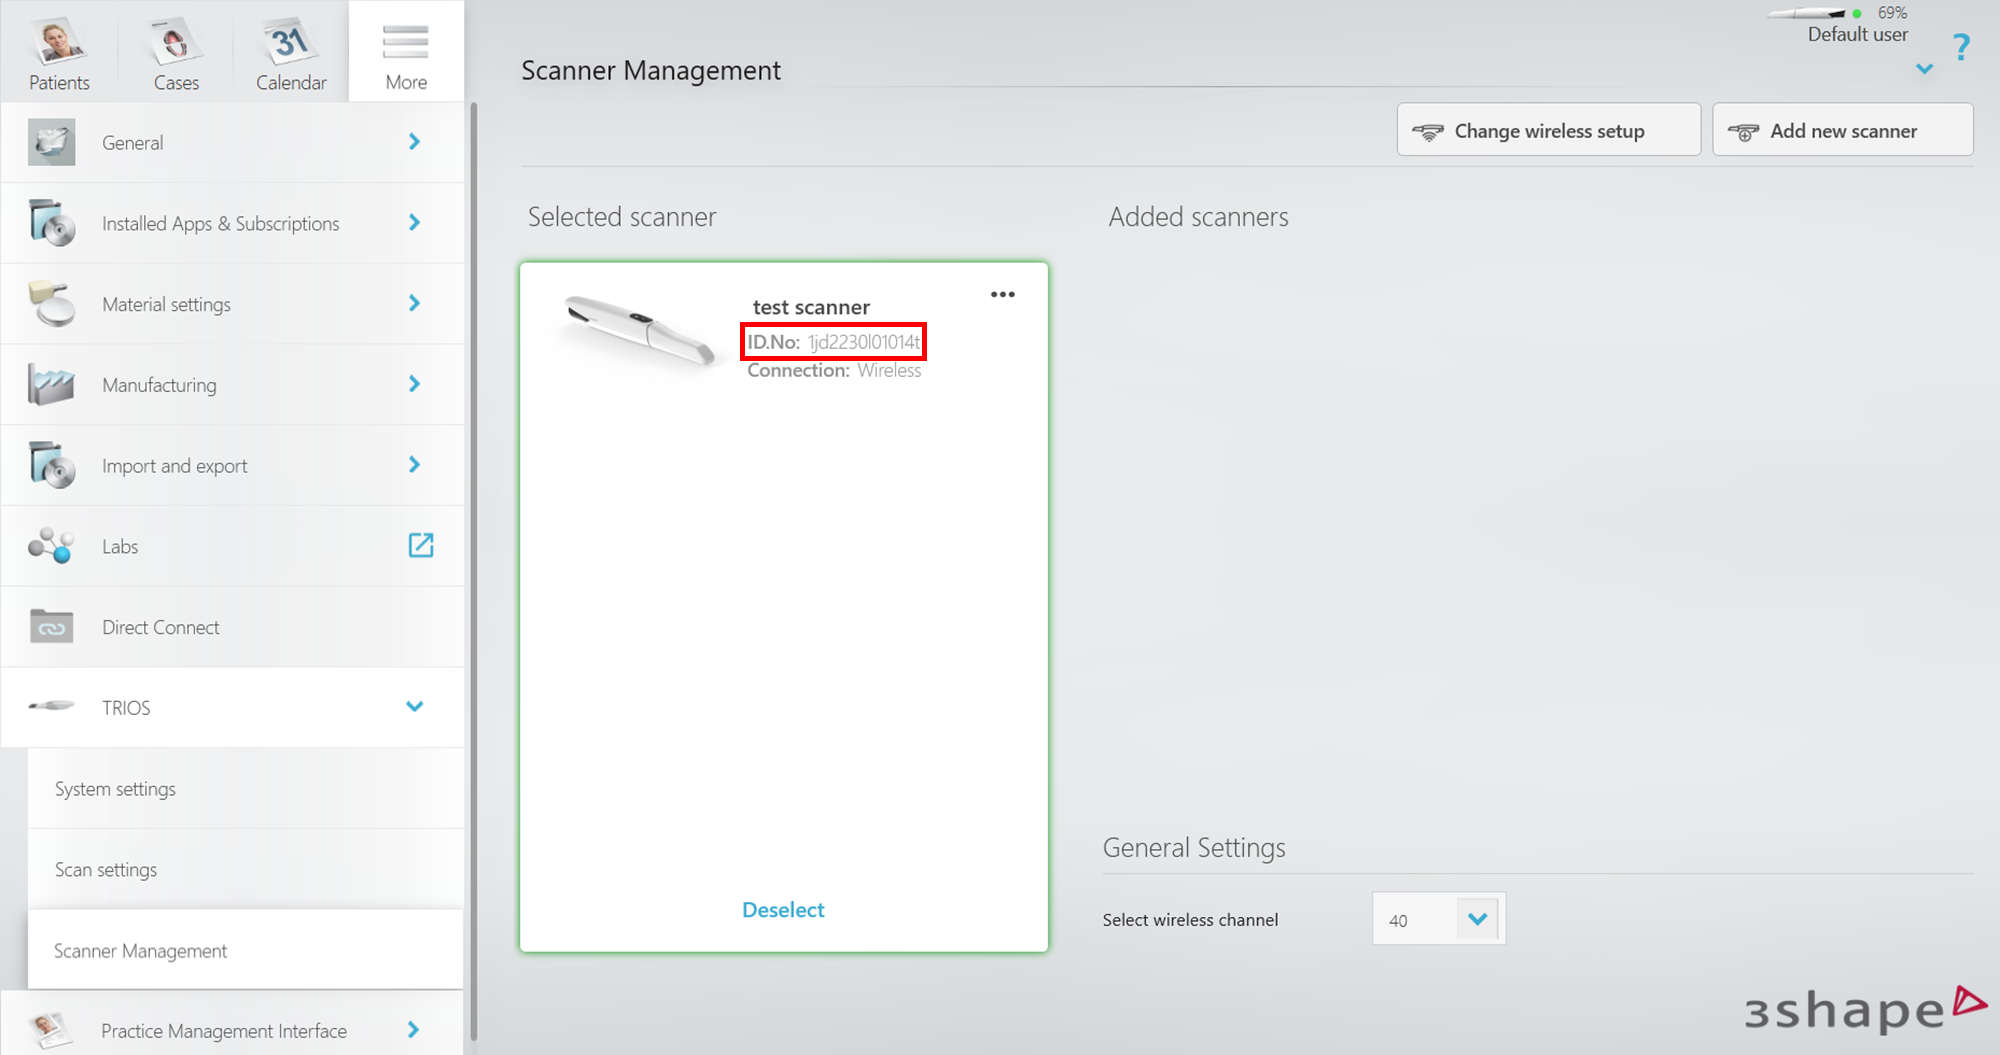
Confirm that the scanner is selected and the serial number is correct. If not, select the option “Add new scanner” and type the correct serial number.
It is recommended to forget the scanner if its serial number is not correct to prevent connection issues in the future. For this select the 3 dots option (Top-right corner on the wrong scanner) and select the option “Forget Scanner”
4. Check if TP-Link is configured correctly
Check if the correct adapter is installed:
1. Open Windows Device Manager (Press Win + R (1) → Type devmgmt.msc (2) → Click OK).

2. In the opened window scroll down to the “Network adapters" category and open it. In there you should see network adapter 3Shape Wireless USB Adapter (TP-Link).

If the TP-Link adapter has TP-Link Wireless USB Adapter indication instead try starting Unite as an administrator by right-clicking the 3Shape Unite icon on your Desktop and selecting “Run as administrator”.

If TP-Link adapter still have incorrect name contact 3Shape Support.
Check if the auto-configuration is disabled for the 3Shape Wireless USB Adapter:
1. Open Windows Network Connection (Press Win + R (1) → Type ncpa.cpl (2) → Click OK).

2. In the opened Window look for the network adapter which represents the 3Shape Wireless USB Adapter (TP-Link) device. It is very important for it to be with the "❌" indication. Note it's name (usually it's "Wi-Fi" or "Wi-Fi 2").

3. Open your PC's Wi-Fi connections list (the one where you select which Wi-Fi network to connect to). In the drop-down select the option with the name of the adapter represented by 3Shape Wireless USB Adapter (TP-Link) which we have found on the previous step.

There should be “No Wi-Fi network found” indication. If you see Wi-Fi network list in here, this means that the TP-Link was not configured correctly, please contact 3Shape Support in this case.
5. Check if 3Shape Wireless Service is running
1. Open Windows services (Press Win + R (1) → Type services.msc (2) → Click OK).

2. Find 3Shape Wireless Service and check if it is running and set to Automatic Startup mode.

- If it is not running, select it and click start.

- If it is not set to Automatic Startup mode (double click it → in the opened window open "startup type" drop-down menu (1) → select “Automatic” → click OK).

- If the service is failing to start, reboot the system and try again. If service still fails to start contact 3Shape Support.
4. Try navigating to http://localhost:8000/3ShapeWirelessService in your browser. If the web page is empty (white, blank) or shows any errors, there could be a compatibility issue with other 3rd-party software or Windows-related issue. Please contact 3Shape Support in this case.
6. Set up the Windows firewall rules (Advanced)
The following material is also represented in the separate How to Set Windows Firewall Rules for TRIOS 3, TRIOS 4, and TRIOS 5 article.
How to Set Windows Firewall Rules for TRIOS 3, TRIOS 4, and TRIOS 5
Introduction
In some cases, institutions, large clinics, or even individual dental practices with an IT department may have network security settings, such as firewall configurations, controlled by group policies or managed directly by the IT department. That is why we provide detailed documentation on the network requirements for Unite, which can be found here: Unite Network Connections.
For obvious reasons, we cannot require customers to disable their firewall. However, the necessary ports and addresses for scanner traffic can be whitelisted, allowing the scanners to function properly even with the firewall enabled.
If you have referred to this article as a troubleshooting measure for an issue like 'Scanner not connecting', please consider the following: If Windows Firewall is disabled on the system, all firewall rules (inbound and outbound) are effectively ignored. This means that before following the step-by-step process in this article, you should first check the status of the firewall. If it is disabled and the scanner is still not connecting, the firewall is not the cause of the problem, making this article irrelevant for that specific scenario.
The same logic applies in reverse. If the firewall is enabled, support can temporarily disable it for testing purposes (if possible). If the scanner connects after disabling the firewall, this confirms that the firewall is the root cause. However, the firewall must be re-enabled afterward, and this article should be followed to create the necessary rules based on the scanner model.
Firewall Rules for TRIOS 3 Wired, TRIOS 3 Wireless, and TRIOS 4 Connections
The following rules are required to prevent any issues with these scanners:
| Port | Protocol | Encryption | Examples of IP addresses | Unite I | Unite II | Unite III |
|---|---|---|---|---|---|---|
| 23796 (SMORP) | TCP | SMORP is a secure proprietary protocol |
10.33.3.1 (fixed IP) |
✅ | ✅ | ✅ |
| 21 (FTP), 80 (HTTP) | TCP, FTP, HTTP | None |
10.33.3.1 (fixed IP) 192.168.1.42 (dynamic IP) |
✅ | ✅ | ✅ |
| 58220-58230 (local) or dynamic | UDP | None |
10.33.3.3 (fixed IP) 192.168.1.42 (dynamic IP) |
✅ | ✅ | ✅ |
Therefore, since the first two share the same protocol and addresses, it is possible to create a single rule that includes ports 21, 80, and 23796, as follows:
- Open “Windows Defender Firewall with Advanced Security”.
-
Locate the Inbound and Outbound Rules sections in the left panel.

-
Click “Inbound Rules” to select it. The right panel of the window will display several actions:

-
Click “New Rule…” to open the Rule Wizard window.
Select “Custom” as the rule type.
-
Click “Next”, and in the Program section, ensure that “All programs” is selected.

-
Click “Next”, and in the Protocol and Ports section, select “TCP” as the Protocol type. For both local and remote ports, select “Specific Ports” and enter
21, 80, 23796in both fields.
-
Click “Next” and in the Scope section, select “These IP addresses” for both local and remote IPs. Then, click “Add…” and a smaller window will appear, allowing you to enter the desired IP address—in this case,
10.33.3.1

Repeat this process for both local and remote IP addresses. -
Click "Next" and ensure that the action “Allow the connection” is selected.

-
Click "Next" and ensure that all three profiles (Domain, Private, and Public) are selected.

-
Click “Next” and set a name for the rule. The name is purely visual and will not affect the rule's functionality. “3Shape TRIOS 3 & 4 TCP” is a good example. Click “Finish” to complete the process.

Once finished, proceed to create the exact same rule in “Outbound Rules” following the same step-by-step process. Just keep in mind that, in step 8, when creating the Outbound Rule, “Block the connection” may sometimes be selected by default. We do not want that, so make sure to switch it to “Allow the connection”.
The rule for ports 58220-58230 must be created separately because the protocol is different. Therefore, proceed as follows:
-
Repeat steps 1 through 6 from the step-by-step process used for the first rule. When you reach the Protocol and Ports section, select “UDP” as the Protocol type. The specific ports should be set to
58220-58230
-
Click “Next” and add the same IP address (
10.33.3.1) used in the first rule for both local and remote IP addresses.
-
Click “Next” and ensure that “Allow the connection” is selected as the action.

-
Click “Next” and ensure that all three profiles (Domain, Private, and Public) are selected.

-
Click “Next” and set a name for the rule. The name is purely visual and does not affect the rule’s functionality. “3Shape TRIOS 5 UDP” is a good example. Click “Finish” to complete the process.

Once finished, proceed to create the exact same rule in “Outbound Rules” following the same step-by-step process. Keep in mind that, in step 3, “Block the connection” may sometimes be selected by default when creating the Outbound Rule. We do not want that, so make sure to switch it to “Allow the connection”.
Firewall rules for TRIOS 5 connection
The only relevant port required for TRIOS 5 traffic is as follows:
| Port | Protocol | Encryption | Unite I | Unite II | Unite III |
|---|---|---|---|---|---|
| 23796 (SMORP) | TCP | SMORP is a secure proprietary protocol | ✅ | ✅ | ✅ |
To create the firewall rule using the information shown above, proceed as follows:
- Open “Windows Defender Firewall with Advanced Security”.
-
Locate the Inbound and Outbound Rules sections in the left panel.
-
Click “Inbound Rules” to select it. The right panel of the window will display several actions:
- Click “New Rule…” to open the Rule Wizard window.
-
For the rule type, select “Port”.

-
Click "Next" and in the Protocol and Ports section, select “TCP” and enter 23796 in the Specific local ports field, as shown in the rule.

-
Click “Next” and ensure that “Allow the connection” is selected as the action.

-
Click “Next” and ensure that all three profiles (Domain, Private, and Public) are selected.

-
Click “Next” and set a name for the rule. The name is purely visual and will not affect the rule’s functionality. “3Shape TRIOS 5” is a good example. Click “Finish” to complete the process.

Once finished, proceed to create the exact same rule in “Outbound Rules” following the same step-by-step process. Keep in mind that, in step 7, when creating the Outbound Rule, “Block the connection” may sometimes be selected by default. We do not want that, so make sure to switch it to “Allow the connection”.
Once the rules are created, a system restart may not always be necessary, depending on the system. However, if the scanner is still not detected, a restart is highly recommended.
TRIOS 5 scanner
1. Check the color of the TRIOS 5 LED ring on the scanner
The following material is also represented in the separate TRIOS 5 LED ring article.
TRIOS 5 LED ring
Introduction
The TRIOS 6 & TRIOS 5 scanners have a LED ring that will tell you when the scanner is:
- Connected
- Ready to scan
- Recording scan data
- Low on battery
LED Lights explained
| Status | LED Ring | Meaning | |
|---|---|---|---|
| Not ready |  |
Pulsing blue |
Connection via Share: Incorrect or no Wi-Fi credentials were entered when connecting the scanner. Connection via TP-Link Wireless Dongle: Scanner is awaiting connection with the software. Needs to be selected on the Scanner Management page. |
 |
Rotating blue |
Connection via Share: Scanner is awaiting connection with the software. Needs to be selected on the Scanner Management page. OR PC is not connected to the needed Wi-Fi. Connection via TP-Link Wireless Dongle: TP-Link is connected but the scanner is not selected on the Scanner Management page. OR TP-Link is not connected. |
|
 |
Constant blue |
Scanner is connected to the system, but no tip is mounted. | |
| Ready |  |
Rotating green |
Scanner is heating the tip. |
 |
Constant green |
Scanner is ready to scan. | |
| Scanning |  |
Rotating white |
Scanner starts scanning and is waiting for scan data. |
 |
Constant white |
Scanner is scanning. *The intensity of the light decreases and becomes dim white, if the scanner loses registration. |
|
| Low battery |  |
Yellow |
A solid yellow or blinking yellow LED ring during scanning means the battery is low. |
| Tip detector issue |  |
Red |
Faulty tip detector. Scanner has to be repaired. |
| LED ring issue |  |
No light |
If the LED ring does not light up when the scanner is turned on (battery is working and charged, scanner fan sound is heard), that means it is faulty and the scanner has to be repaired. |
In case of any additional questions, please contact 3Shape Support.
2. Enable DHCP for scanner network (Advanced)
By default the DHCP should be enabled for the scanner network, but in some cases it can become disabled, which may affect the scanner connectivity.
To check the DHCP status:
1. Connect the scanner by selecting it in Scanner Management in 3Shape Unite and wait for the “Turn on the scanner to establish connection” window.

2. Open Windows Network Connection (Press Win + R (1) → Type ncpa.cpl (2) → Click OK (3) ).
3. In the opened Network Connections window find the adapter called “ScannerNet” and open it's properties by right-clicking it (1) and selecting “Properties” (2).

4. In the adapter properties window: select “Internet Protocol Version 4 (TCP/IPv4)” (1) → select “Properties” (2) → in the new IPv4 Properties window in the general tab make sure that both options are set to “Obtain … automatically” (3), if not - set them to enable DHCP → confirm the changes with “OK” button (4).

If you often experience scanner disconnections while working via TP-Link and the DHCP keep disabling it self it could be the Windows related issue. Please contact your local IT or 3Shape Support.
TRIOS 3 / TRIOS 4 Wireless scanners
1. Check the color of LED indicator on the back of TRIOS 3 / TRIOS 4 scanner
Check whether the LED indicator on the back of the scanner is blue, green, or off
| Indicator state | Description |
|---|---|
| If the indicator is off, this is a hardware issue | Try changing the battery and if it is still off, contact 3Shape Support |
| Indicator is blue and blinking | This means the scanner is attempting to connect |
| Indicator is green | The scanner is properly connected to PC |
TRIOS Share
TRIOS Share requirements
To ensure that your local area network can run TRIOS Share, please consult with your local IT person to find out if your network meets following the requirements:
The basic TRIOS Share requirements can be found in this article. The advanced TRIOS Share requirements are the following:
TRIOS Share network requirements
-
Communication standard:
- 802.11ac Support (limited to 5 GHz only).
- If the network has multiple access points, then please ensure that they use different frequencies/channels.
- The channel width should be set to at least VHT40 (40 MHz) to ensure enough bandwidth.
- 802.11ac Support (limited to 5 GHz only).
-
Network capacity:
- Recommended capacity of min. 70 Mbps on local network for each TRIOS 3 & TRIOS 4 scanner in use (36 Mbps data).
- Recommended capacity of min. 90 Mbps on local network for each TRIOS 5 scanner in use (46 Mbps data).
-
Signal strength:
- Recommended Wi-Fi signal strength above -60 dBm.
- To ensure the best signal quality we recommend that each scanner should have direct line of sight to an access point.
-
Bi-directional traffic:
- Bi-directional traffic permitted between the TRIOS scanner and Dental Desktop client PC.
-
Ports that should be open for communication:
- The following TCP ports are used on TRIOS 3 Wireless and TRIOS 4 scanners: 20-21, 80 and 23796.
- The following TCP ports are used on TRIOS 5 and TRIOS 6 scanners: 23796.
- The following UDP ports are used on the TRIOS scanners: 58218 and 58220-58230.
- The following UDP ports are used on the PC or router: 67 (DHCP), 5353 (mDNS).
- Redirection of traffic done for example by Captive Portals must be disabled.
- Windows firewall rules are added to the PC's firewall as part of the installation process of Dental Desktop so usually no further configuration is required.
-
mDNS:
- mDNS should be enabled (required for scanner discovery).
-
WPA authentication for TRIOS scanners:
- WPA2 Personal (WPA2-PSK) is supported on all Trios scanners.
- Pairwise and group: CCMP and TKIP.
- WPA3 Personal (SAE) and mixed WPA2/WPA3 Personal is supported on TRIOS 3 Wireless and TRIOS 4 from ManxLinux 2.6.8.X available in ScanSuite 1.7.14.0 included in TRIOS module 1.18.6.4 and 1.18.7.4.
- WPA3 Personal (SAE) and mixed WPA2/WPA3 Personal is supported on TRIOS 5 from scan-os 1.16.0 available in ScanSuite 1.7.14.0 included in TRIOS module 1.18.6.4 and 1.18.7.4.
- Note that for Wi-Fi 6E (6 GHz) some network devices only allow WPA3 (even on 5 GHz APs) so it will not be possible to use TRIOS scanners on those networks if the TRIOS scanners are not updated to a version that supports it.
- WPA2 Personal (WPA2-PSK) is supported on all Trios scanners.
-
Network name (SSID):
- Networks with hidden SSIDs are not supported.
- It affects scan time negatively without any real benefit for the user.
- SSIDs and passwords are limited to printable ASCII characters.
- https://en.wikipedia.org/wiki/ASCII#Printable_characters
- The SSID must be between 1 and 32 characters long.
- The PSK must be between 8 and 63 characters long. Also for networks using WPA3.
- Both the SSID and the PSK is case sensitive!
- Networks with hidden SSIDs are not supported.
-
Network settings that should be disabled for the correct TRIOS Share scanner connectivity and operation:
- Please consult the user manual for the network software for specific details.
- Examples from an Ubiquity network that must/should be disabled are:
- Jumbo frames, Ubiquity warns about connectivity issues if clients do not support it.
- Flow control, reduces network congestion and high packet latency by pausing traffic.
- Multicast enhancement. Must be disabled because it converts multicast traffic to unicast which prevents scanner discovery.
- Multicast and Broadcast Control. Must be disabled or TRIOS scanners need to be added to exception lists to allow use of multicast DNS.
- Client Device Isolation, prevents clients on the same AP from communicating with each other so this must be disabled.
- Proxy Arp, allows APs to "proxy" common broadcast frames as unicast which can cause connectivity issues.
- BSS Transition. Clients that do not support this may experience connectivity issues.
- Fast roaming. 802.11r is not supported on TRIOS scanners.
- 802.11 DTIM Period: should be on auto setting since it can result in client disconnections.
- DHCP Snooping, can reduce connectivity if there is a large packet queue.
Troubleshooting TRIOS Share
Scanner disconnects when scanning:
The main reason for that could be the bad low signal strength/quality. To check the signal strength you can run the TRIOS Share network Assessment. To do so: connect the scanner via TRIOS Share → navigate to scanner management → click “Assess Network Performance” on the connected scanner tile. After the test is finished, the full report can be open in your default browser by selecting “Download report” option.
All reports are saved to C:\ProgramData\3Shape\DentalDesktop\ThreeShape.TRIOS\NetworkAssessmentReports (for default install locations).

The Signal strength can be found under the Wi-Fi section.
The bare minimum signal strength is -60 dBm but we recommend you to keep it around -40 dBm for the best scanning experience and stable connectivity.
Solution
To ensure the best signal quality we recommend that each scanner should have direct line of sight to an access point without or minimum obsicles on the way (especially the metal ones).
Scanner has bad connection when/after moving between rooms:
In some situations the scanner can stay connected to an access point even though another access point is closer leading to weaker signal and lower bandwidth usage. The scanner searches for available access points like this:
- When the scanner powers up, it quickly connects to the same SSID and Wi-Fi frequency it was last connected to.
- The scanner then starts scanning for better Wi-Fi frequencies for the SSID, once every 30 seconds. It looks for better APs (frequencies) that it can roam to.
- When Unite connects to the scanner, it disables roaming. When it disconnects, it re-enables roaming.
Solution
So, if Unite connects to the scanner on the old access point before 30 seconds has passed, the scanner will not get a chance to roam to a better AP. To get it to roam to a better AP, deselect the scanner from Unite, wait 40 seconds, then select the scanner in Unite again. This should get it to roam to a better AP. The next time the scanner powers on it will fast connect to the last AP it was connected to, so this process should only be done when moving between APs.
Some access points have a setting where it can automatically drop the connection to connected devices if the signal strength is too weak. Usually the limit is something like -70 dBm but it can be configurable by the user. This can be used to force scanners to roam to the nearest access point.