Identifying folders shared during Dental System Server installation
08/11/2023Sharing and Setting Permissions for Dental System Components on Multiple PCs
If Dental System components are installed on different PCs, the component folders must be shared and available with Full Control permissions for the Everyone group.
When performing a Server installation, the required Dental System folders are shared automatically.
Automatically Shared Folders During Server Installation
The following folders are automatically shared during a Server installation:
Local Folder |
Share Name |
C:\3Shape |
3Shape Dental System Orders |
C:\3Shape Configuration\Dental System |
3Shape Dental System Configuration |
C:\Program Files\3Shape |
3Shape Dental System |
C:\ProgramData\3Shape\DentalSystem\3ShapeCommunicate |
3Shape Communicate DataSync Exchange |
C:\ProgramData\3Shape\DentalSystem |
3Shape Dental System Internal Data |
C:\ProgramData\3Shape\DentalSystem\Documentation\[version folder] |
3Shape Dental Documentation |
After a folder has been shared, its network path can be viewed:
- In the folder's properties.
-
In the component paths configured under "Dental System Control Panel" > "System Settings".


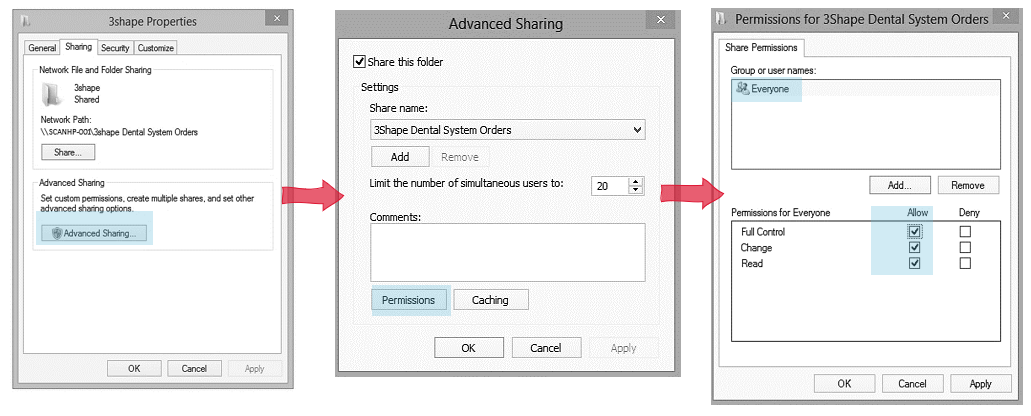
Verifying Sharing Permissions
Follow the steps below to verify the sharing permissions for a shared folder.
Step 1: Right-click the folder and select "Properties".
Step 2: Select the "Sharing" tab.
Step 3: Select "Advanced Sharing".
Step 4: Select "Permissions".
Step 5: Verify that the Everyone group has "Full Control" permissions.
If the permissions are not configured correctly:
Step 6: If the Everyone group is not listed, click "Add".
Step 7: Enter Everyone and click "OK".
Step 8: Enable "Full Control" permissions.
Step 9: Click "OK" to save the changes.
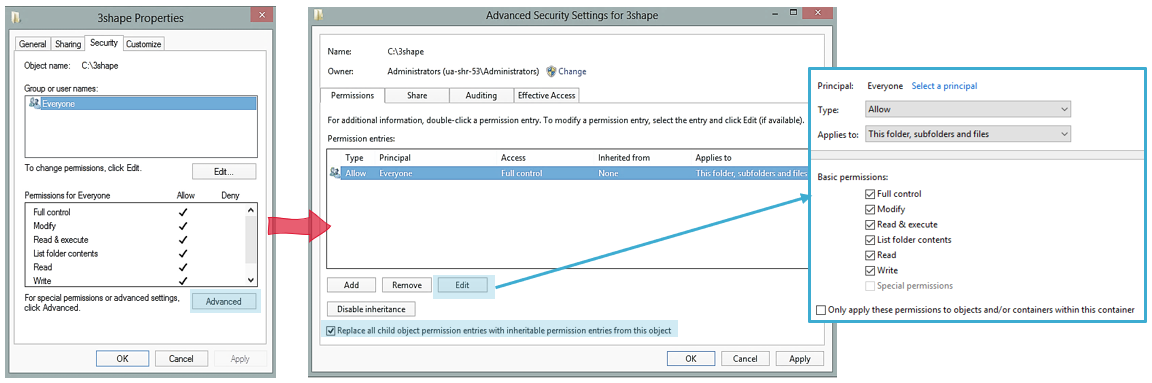
Verifying Security Permissions
Follow the steps below to verify the security permissions for a shared folder.
Step 1: Right-click the folder and select "Properties".
Step 2: Select the "Security" tab.
Step 3: Verify that the Everyone group has "Full Control" permissions.
If the permissions are not configured correctly:
Step 4: Click "Advanced".
Step 5: If the Everyone group is not listed, click "Add".
Step 6: Enter Everyone as the principal and click "OK".
If the Everyone group already exists:
Step 7: Select the existing entry and click "Edit".
Step 8: Modify the permissions as required.
Step 9: Enable "Replace all child object permissions with inheritable permissions from this object".
Step 10: Click "OK" to save the changes.
Contact 3Shape Support if you have any further questions.
For full information on correct usage consult the official Safety and Setup Guide and the most current Manual.